


Recherche dans le blog
Water Softeners
What is a water softener used for?
- What is a water softener?
- Why should you remove limescale from water?
- Does this affect me? Do I need a water softener?
- Is installing a water softener complicated?
- How do I adjust my water softener?
- What comes next?
- Reason No. 1: Rediscover the true feel of water on your skin
- Reason No. 2: Protect your pipes and your wallet
- Reason No. 3: Protect your household appliances
- Reason No. 4: Stop using excessive amounts of cleaning products
The impact of limescale on your bills
How do you choose your water softener?
The different types of water softener valves
TUTORIAL: Connecting your water softener to the water supply
VIDEO: Installing your water softener
- The different buttons on the water softener valve
- Programming your water softener
- Manually regenerating your water softener
Recommendations before installing a water softener
- Choosing the right location for your water softener
- Thoroughly checking your water softener before installation
- A minimum pressure is required
- Protecting your water softener
- Tools for installing your water softener
- Accessories for installing your pre-filter
Water softener diagram and components
- Water softener installation diagram
- The different components of a water softener
- How a water softener works
- The regeneration process
- Where should you install a water softener?
Water Softener Diagram and Components
Understanding how a mechanism works enables you to maintain it properly and therefore indirectly ensures a long lifespan. With this in mind, we explain how a water softener works in as much detail as possible.
Water softener installation diagram
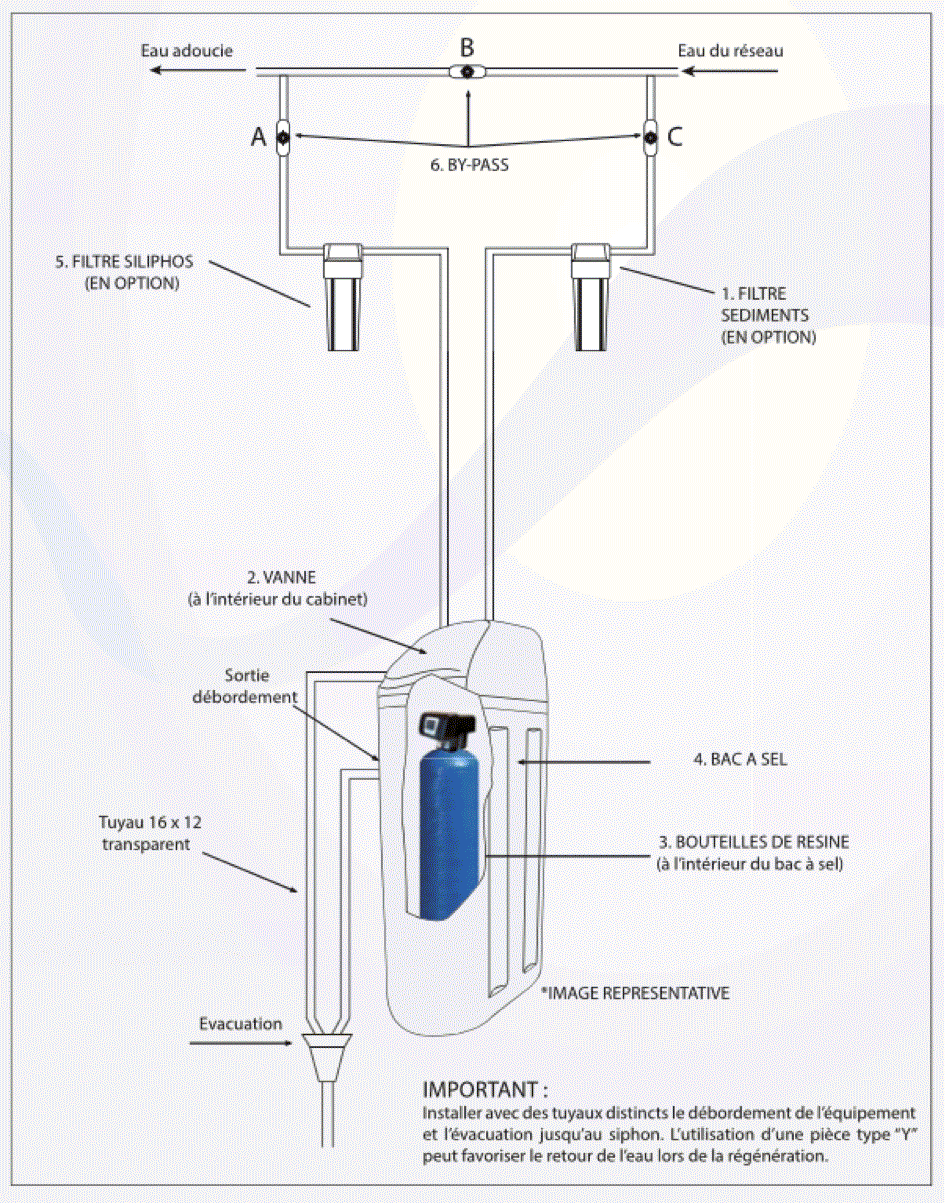
The different components of a water softener
The water softening equipment consists of the following components (see installation diagram):
1. Sediment filter (optional):
A component containing a filter cartridge whose role is to trap suspended particles larger than 50 microns in the water
2. Valve:
This component contains the mechanisms for automatically regenerating the resins through a programming system based on time or the volume of water consumed
3. Resin tank:
Contains the ion-exchange resins that carry out the softening process
4. Salt tank:
A tank for storing salt. Its capacity allows considerable time between salt refills, and this is where the brine needed for the softening process is produced
5. Siliphos filter (optional):
A component containing a siliphos cartridge whose role is to protect piping from corrosion
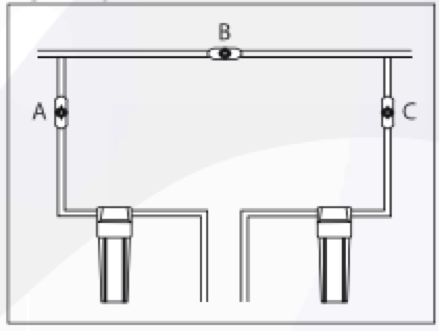
6. Bypass:
A system of three valves that allows you to isolate the main piping from the equipment in the event of a breakdown or maintenance. The bypass prevents water from passing through the equipment. This means there is no need to shut off the main water supply when changing a filter or making repairs.
How a water softener works
A water softener, especially a resin-based one, works through ion exchange. The resin it contains acts as the exchange medium. It is held in a tank into which untreated water enters.
This hard water passes through the resin, exchanging calcium and magnesium ions (limescale) for sodium ions. This process enables hard water to become soft and applies to salt-based water softeners.
The resin thus exchanges its sodium content for the magnesium and calcium in the untreated water and may eventually become saturated. At that point, it must be regenerated through a clearly defined process.
The regeneration process
To rid the resin of excess limescale or scale, the water softener's salt tank reverses its charge. Regeneration follows five steps, starting with backwashing, during which water flows from bottom to top through the water softener to remove limescale from the resins.
The limescale deposit is then flushed out during the brining or salt draw process, and the resins regain their sodium. To do this, brine is added to the water softener.
The device's circuit may also contain excess sodium that could make your tap water salty. It is removed during rinsing, which consists of rinsing the resin.
The next phase is refilling, which involves sending water back into the water softener's salt tank to prepare fresh brine for the next regeneration. Finally, the device returns to its service cycle so that it produces softened water once again.
Where should you install your water softener?
To know where to place your water softener, locate your home's main water inlet. In other words, you generally connect this device after the water meter. Because installation is technical and essential, we suggest entrusting it to a professional.
- Published on
- Water Softeners
Related products
Related blog posts
>-

Manually Regenerating Your Water Softener
Sometimes you need to start your water softener's...
-

How to Choose Your Water Softener
To get the information you need to know how to choose...
-

Why Soften Your Water?
Wondering why it is important to soften your water?...
-
Manually Regenerating Your Water Softener
Sometimes you need to start your water softener's...
-
How to Choose Your Water Softener
To get the information you need to know how to choose...
-
Why Soften Your Water?
Wondering why it is important to soften your water?...